mac安装redis

首先查看是否安装了homebrew

brew --version

如果此命令失败,那么先去安装homebrew吧。

安装

从终端运行来安装redis:

brew install redis

在前台启动和停止 Redis

从命令行运行以下命令来测试是否成功安装了redis:

redis-server

如果成功,将看到 Redis 的启动日志,并且 Redis 将在前台运行。

输入Ctrl-C停止redis

使用 launchd 启动和停止 Redis

作为在前台运行 Redis 的替代方案,还可以使用launchd在后台启动进程:

brew services start redis

这将启动 Redis 并在登录时重新启动它。可以launchd通过运行以下命令检查托管 Redis 的状态:

brew services info redis

如果服务正在运行,将看到如下输出:

redis (homebrew.mxcl.redis)
Running: ✔
Loaded: ✔
User: yourname
PID: 67836

要停止服务,请运行:

brew services stop redis

连接到 Redis

Redis 运行后,可以运行以下命令对其进行测试redis-cli

redis-cli

这将打开 Redis REPL。尝试运行一些命令:

127.0.0.1:6379> lpush demos redis-macOS-demo
OK
127.0.0.1:6379> rpop demos
"redis-macOS-demo"

Android Studio 模拟器无法联网

本来as的模拟器用着好好得,突然有一次build之后就无法上网了。 不仅自己的app,连默认浏览器都不行。 下面是三种方法

1: 我就是遇到的这种问题,因为配了android studio的代理导致模拟器不能联网:

解决方案:在模拟器中选择设置(…)->代理(Proxy)->选择No proxy把代理取消掉就可以了。

2: 另外看到有说修改网络设置,将ipv6改成local的,这个我有试过但是没效果,如下图:

3: 还有说法是修改本地dns为8.8.8.8或者其他稳定ip的。这个感觉和模拟器已经没关系了,如果有问题自己的实体机应该也会不稳定。

mac查看硬盘使用情况

mac有很多方法查看硬盘使用情况

  1. 使用自带的硬盘检测工具 disk Utility
  2. 使用自带的shell命令
    1. du -sh . | sort -rn | head -n 10
  3. 使用一个形象可视化的shell命令ncdu(推荐)
    1. 安装:在命令行中输入:brew install ncdu
    2. 使用:在命令行中输入:ncdu+空格+路径
      1. 举例,查看当前路径硬盘使用情况,就是(ncdu+空格+点): ncdu .
      2. 举例,查看所有硬盘使用情况,就是(ncdu+空格+”/”): ncdu /

快捷键如下所示:

? — 使用帮助
up, k — 向上移动光标
down, j – 向下移动光标
right/enter — 打开选定的目录
left, <, h — 打开父目录
n — 按文件名排序(升序/降序)
s — 按文件大小排序(升序/降序)
C – 按项目数排序(升序/降序)
d – 删除选定的文件或目录
t — 排序时将目录放在文件前面
g – 以图形方式显示百分比

如果发现硬盘占用不多,但是总会提示可用空间不足, 或者在硬盘工具disk Utility中显示没有空间,可以参考这篇文章:如何处理mac空间不足的问题

mac空间不足

先说结果:是由于时间机器(time machine)的自动备份造成的。

在Mac的「关于本机」中显示我的电脑还有90多G的可用空间,但是使用硬盘工具(disk Utility)时发现空间都被Macintosh – Data占用了。

用了各种工具shell命令一起用,发现根本解决不了问题,期间还发现了mac firmlink的骚操作。

使用硬盘工具,显示如下信息:

「可用100.41GB(73.22GB可清除)」

这就引起了我的注意,因为如果这73.22GB清除掉,就是我正常可用的空间了,也和「关于本机」中的数据相符。

具体方法为:

在「系统偏好设置」中,找到「时间机器」,将「自动备份」取消勾选。

  1. 启动「终端」,输入以下命令

sudo tmutil listlocalsnapshots /
输入完成后,会要求你输入管理员密码,输入后回车。

  1. 这时候就会出现一堆写着Time Machine的字符出现。
  1. 输入

tmutil deletelocalsnapshots XXXX-XX-XX-XXXXXX
这里的「XXXX-XX-XX-XXXXXX」是Time Machine后面的那串数字,如 2021-08-19-103846。

  1. 等待一会,出现「Deleted local snapshot」后代表删除成功。

操作结束后,回到「磁盘工具」可以发现可用空间变多了

但是仍然显示有73.22GB可清除。此时只需重启电脑。

PHP使用curl

php封装好的5种不同方式的curl请求函数

<?php
//get请求
function geturl($url){
        $headerArray =array("Content-type:application/json;","Accept:application/json");
        $ch = curl_init();
        curl_setopt($ch, CURLOPT_URL, $url);
        curl_setopt($ch, CURLOPT_SSL_VERIFYPEER, FALSE); 
        curl_setopt($ch, CURLOPT_SSL_VERIFYHOST, FALSE); 
        curl_setopt($ch, CURLOPT_RETURNTRANSFER, 1);
        curl_setopt($ch,CURLOPT_HTTPHEADER,$headerArray);
        $output = curl_exec($ch);
        curl_close($ch);
        $output = json_decode($output,true);
        return $output;
}

//post请求
function posturl($url,$data){
        $data  = json_encode($data);    
        $headerArray =array("Content-type:application/json;charset='utf-8'","Accept:application/json");
        $curl = curl_init();
        curl_setopt($curl, CURLOPT_URL, $url);
        curl_setopt($curl, CURLOPT_SSL_VERIFYPEER, FALSE);
        curl_setopt($curl, CURLOPT_SSL_VERIFYHOST,FALSE);
        curl_setopt($curl, CURLOPT_POST, 1);
        curl_setopt($curl, CURLOPT_POSTFIELDS, $data);
        curl_setopt($curl,CURLOPT_HTTPHEADER,$headerArray);
        curl_setopt($curl, CURLOPT_RETURNTRANSFER, 1);
        $output = curl_exec($curl);
        curl_close($curl);
        return json_decode($output,true);
}


//put请求
function puturl($url,$data){
    $data = json_encode($data);
    $ch = curl_init(); //初始化CURL句柄 
    curl_setopt($ch, CURLOPT_URL, $url); //设置请求的URL
    curl_setopt ($ch, CURLOPT_HTTPHEADER, array('Content-type:application/json'));
    curl_setopt($ch, CURLOPT_RETURNTRANSFER,1); //设为TRUE把curl_exec()结果转化为字串,而不是直接输出 
    curl_setopt($ch, CURLOPT_CUSTOMREQUEST,"PUT"); //设置请求方式
    curl_setopt($ch, CURLOPT_POSTFIELDS, $data);//设置提交的字符串
    $output = curl_exec($ch);
    curl_close($ch);
    return json_decode($output,true);
}

//del请求
function delurl($url,$data){
    $data  = json_encode($data);
    $ch = curl_init();
    curl_setopt ($ch,CURLOPT_URL,$put_url);
    curl_setopt ($ch, CURLOPT_HTTPHEADER, array('Content-type:application/json'));
    curl_setopt ($ch, CURLOPT_RETURNTRANSFER, 1);
    curl_setopt ($ch, CURLOPT_CUSTOMREQUEST, "DELETE");   
    curl_setopt($ch, CURLOPT_POSTFIELDS,$data);
    $output = curl_exec($ch);
    curl_close($ch);
    $output = json_decode($output,true);
}

//patch请求
function patchurl($url,$data){
    $data  = json_encode($data);
    $ch = curl_init();
    curl_setopt ($ch,CURLOPT_URL,$url);
    curl_setopt ($ch, CURLOPT_HTTPHEADER, array('Content-type:application/json'));
    curl_setopt ($ch, CURLOPT_RETURNTRANSFER, 1);
    curl_setopt ($ch, CURLOPT_CUSTOMREQUEST, "PATCH");  
    curl_setopt($ch, CURLOPT_POSTFIELDS,$data);     
    $output = curl_exec($ch);
    curl_close($ch);
    $output = json_decode($output);
    return $output;
}
?>

CentOS7 手动部署lnmp环境

步骤一:准备编译环境

  1. 关闭防火墙。
    1. 运行systemctl status firewalld命令,查看当前防火墙的状态。查看防火墙状态
      • 如果防火墙的状态参数是inactive,则防火墙为关闭状态。
      • 如果防火墙的状态参数是active,则防火墙为开启状态。
    2. 关闭防火墙。如果防火墙为关闭状态可以忽略此步骤。
      • 如果您想临时关闭防火墙,需要运行以下命令:systemctl stop firewalld说明 临时关闭防火墙后,如果Linux实例重启,则防火墙将会自动开启。
      • 如果您想永久关闭防火墙,需要依次运行以下命令:
        1. 关闭防火墙。systemctl stop firewalld
        2. 实例开机时,禁止启动防火墙服务。systemctl disable firewalld
  2. 关闭SELinux。
    1. 运行getenforce命令查看SELinux的当前状态。
      • 如果SELinux状态参数是Disabled,则SELinux为关闭状态。
      • 如果SELinux状态参数是Enforcing,则SELinux为开启状态。
    2. 关闭SELinux。如果SELinux为关闭状态可以忽略此步骤。

步骤二:安装Nginx

  1. 运行以下命令安装Nginx。yum -y install nginx
  2. 运行以下命令查看Nginx版本。nginx -v返回结果如下所示,表示Nginx安装成功。nginx version: nginx/1.20.1

步骤三:安装MySQL

  1. 运行以下命令更新YUM源。rpm -Uvh http://dev.mysql.com/get/mysql57-community-release-el7-9.noarch.rpm
  2. 运行以下命令安装MySQL。说明 如果您使用的操作系统内核版本为el8,可能会提示报错信息No match for argument。您需要先运行命令yum module disable mysql禁用默认的MySQL模块,再安装MySQL。yum -y install mysql-community-server
  3. 运行以下命令查看MySQL版本号。mysql -V返回结果如下所示,表示MySQL安装成功。mysql Ver 14.14 Distrib 5.7.36, for Linux (x86_64) using EditLine wrapper
  4. 运行以下命令启动MySQL。systemctl start mysqld
  5. 依次运行以下命令设置开机启动MySQL。systemctl enable mysqldsystemctl daemon-reload

步骤四:安装PHP

  1. 更新YUM源。
    1. 运行以下命令添加epel源。yum install \https://repo.ius.io/ius-release-el7.rpm \https://dl.fedoraproject.org/pub/epel/epel-release-latest-7.noarch.rpm
    2. 运行以下命令添加Webtatic源。rpm -ivh https://mirror.webtatic.com/yum/el7/webtatic-release.rpm
  2. 运行以下命令安装PHP。yum -y install php71w-devel php71w.x86_64 php71w-cli.x86_64 php71w-common.x86_64 php71w-gd.x86_64 php71w-ldap.x86_64 php71w-mbstring.x86_64 php71w-mcrypt.x86_64 php71w-pdo.x86_64 php71w-mysqlnd php71w-fpm php71w-opcache php71w-pecl-redis php71w-pecl-mongodb
  3. 运行以下命令查看PHP版本。php -v返回结果如下所示,表示安装成功。PHP 7.0.33 (cli) (built: Dec 6 2018 22:30:44) ( NTS )Copyright (c) 1997-2017 The PHP GroupZend Engine v3.0.0, Copyright (c) 1998-2017 Zend Technologies with Zend OPcache v7.0.33, Copyright (c) 1999-2017, by Zend Technologies

步骤五:配置Nginx

  1. 运行以下命令备份Nginx配置文件。cp /etc/nginx/nginx.conf /etc/nginx/nginx.conf.bak
  2. 修改Nginx配置文件,添加Nginx对PHP的支持。说明 若不添加此配置信息,后续您使用浏览器访问PHP页面时,页面将无法显示。
    1. 运行以下命令打开Nginx配置文件。vim /etc/nginx/nginx.conf
    2. 按i进入编辑模式。
    3. server大括号内,修改或添加下列配置信息。除下面提及的需要添加或修改的配置信息外,其他配置保持默认值即可。
      • 添加或修改location /配置信息。 location / { index index.php index.html index.htm; }
      • 添加或修改location ~ .php$配置信息。 #添加下列信息,配置Nginx通过fastcgi方式处理您的PHP请求。 location ~ .php$ { root /usr/share/nginx/html; #将/usr/share/nginx/html替换为您的网站根目录,本文使用/usr/share/nginx/html作为网站根目录。 fastcgi_pass 127.0.0.1:9000; #Nginx通过本机的9000端口将PHP请求转发给PHP-FPM进行处理。 fastcgi_index index.php; fastcgi_param SCRIPT_FILENAME $document_root$fastcgi_script_name; include fastcgi_params; #Nginx调用fastcgi接口处理PHP请求。 }
      添加或修改配置信息后,文件内容如下图所示:nginx配置文件
    4. 按下Esc键后,输入:wq并回车以保存关闭配置文件。
  3. 运行以下命令启动Nginx服务。systemctl start nginx
  4. 运行以下命令设置Nginx服务开机自启动。systemctl enable nginx

步骤六:配置MySQL

  1. 运行以下命令查看/var/log/mysqld.log文件,获取并记录root用户的初始密码。grep 'temporary password' /var/log/mysqld.log命令行返回结果如下,其中ARQTRy3+n8*W为MySQL的初始密码。在下一步重置root用户密码时,会使用该初始密码。2021-11-10T07:01:26.595215Z 1 [Note] A temporary password is generated for root@localhost: ARQTRy3+n8*W
  2. 运行以下命令配置MySQL的安全性。mysql_secure_installation
    1. 输入MySQL的初始密码。说明 在输入密码时,系统为了最大限度的保证数据安全,命令行将不做任何回显。您只需要输入正确的密码信息,然后按Enter键即可。Securing the MySQL server deployment. Enter password for user root: #输入上一步获取的root用户初始密码
    2. 为MySQL设置新密码。The existing password for the user account root has expired. Please set a new password. New password: #输入新密码。长度为8至30个字符,必须同时包含大小写英文字母、数字和特殊符号。特殊符号包含()` ~!@#$%^&*-+=|{}[]:;‘<>,.?/ Re-enter new password: #确认新密码。The 'validate_password' plugin is installed on the server.The subsequent steps will run with the existing configurationof the plugin.Using existing password for root. Estimated strength of the password: 100 #返回结果包含您设置的密码强度。Change the password for root ? ((Press y|Y for Yes, any other key for No) :Y #您需要输入Y以确认使用新密码。 #新密码设置完成后,需要再次验证新密码。New password:#再次输入新密码。 Re-enter new password:#再次确认新密码。 Estimated strength of the password: 100Do you wish to continue with the password provided?(Press y|Y for Yes, any other key for No) :Y #您需要输入Y,再次确认使用新密码。
    3. 输入Y删除匿名用户。Remove anonymous users? (Press y|Y for Yes, any other key for No) :YSuccess.
    4. 输入Y禁止使用root用户远程登录MySQL。Disallow root login remotely? (Press y|Y for Yes, any other key for No) :YSuccess.
    5. 输入Y删除test库以及用户对test库的访问权限。Remove test database and access to it? (Press y|Y for Yes, any other key for No) :Y - Dropping test database...Success. - Removing privileges on test database...Success.
    6. 输入Y重新加载授权表。Reload privilege tables now? (Press y|Y for Yes, any other key for No) :YSuccess. All done!

步骤七:配置PHP

  1. 新建并编辑phpinfo.php文件,用于展示PHP信息。
    1. 运行以下命令新建phpinfo.php文件。vim <网站根目录>/phpinfo.php<网站根目录>是您在nginx.conf配置文件中location ~ .php$大括号内,配置的root参数值,如下图所示。网站根目录
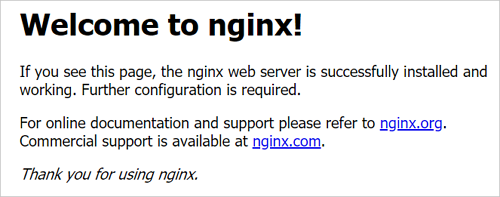
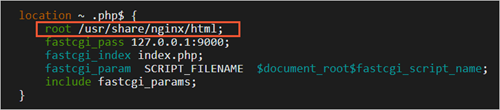
本文配置的网站根目录为/usr/share/nginx/html,因此需要运行以下命令新建phpinfo.php文件:vim /usr/share/nginx/html/phpinfo.php
    2. 按i进入编辑模式。
    3. 输入下列内容,函数phpinfo()​会展示PHP的所有配置信息。<?php echo phpinfo(); ?>
    4. 按Esc键后,输入:wq并回车,保存关闭配置文件。
  2. 运行以下命令启动PHP-FPM。systemctl start php-fpm
  3. 运行以下命令设置PHP-FPM开机自启动。systemctl enable php-fpm

步骤八:测试访问LNMP配置信息页面

  1. 在本地Windows主机或其他具有公网访问能力的Windows主机中,打开浏览器。
  2. 在浏览器的地址栏输入http://<ECS实例公网IP地址>/phpinfo.php进行访问。访问结果如下图所示,表示LNMP环境部署成功。php结果

后续步骤

测试访问LNMP配置信息页面后,建议您运行以下命令将phpinfo.php文件删除,消除数据泄露风险。

rm -rf <网站根目录>/phpinfo.php

其中,<网站根目录>需要替换为您在nginx.conf中配置的网站根目录。本文配置的网站根目录为/usr/share/nginx/html,因此需要运行以下命令:

rm -rf /usr/share/nginx/html/phpinfo.php

常见问题

如何使用其他版本的Nginx服务器?

  1. 使用浏览器访问Nginx开源社区获取对应的Nginx版本的下载链接。请根据您的个人需求,选择对应的Nginx版本。本章节以Nginx 1.8.1为例。
  2. 远程连接需要部署LNMP环境的ECS实例。
  3. 运行wget命令下载Nginx 1.8.1。您可以通过Nginx开源社区直接获取对应版本的安装包URL,然后通过wget URL的方式将Nginx安装包下载至ECS实例。例如,Nginx 1.8.1的下载命令如下:wget http://nginx.org/download/nginx-1.8.1.tar.gz
  4. 运行以下命令,安装Nginx相关依赖。yum install -y gcc-c++yum install -y pcre pcre-develyum install -y zlib zlib-develyum install -y openssl openssl-devel
  5. 运行以下命令,解压Nginx 1.8.1安装包,然后进入Nginx所在的文件夹。tar zxvf nginx-1.8.1.tar.gzcd nginx-1.8.1
  6. 依次运行以下命令,编译源码。./configure \ --user=nobody \ --group=nobody \ --prefix=/usr/local/nginx \ --with-http_stub_status_module \ --with-http_gzip_static_module \ --with-http_realip_module \ --with-http_sub_module \ --with-http_ssl_modulemake && make install
  7. 运行以下命令,进入Nginx的sbin目录,然后启动Nginx。cd /usr/local/nginx/sbin/./nginx
  8. 在本地主机中,使用浏览器访问ECS实例公网IP。出现如下图所示的页面,表示Nginx已成功安装并启动。nginx